

Launch a Web App Containing Web Server and Database Server on AWS EC2 and Complete Infrastructure Created Using Terraform
Task Overview
- Write an Infrastructure as code using Terraform, which automatically creates a VPC.
- In that VPC we have to create 2 subnets: a. public subnet ( for Public World ). b. private subnet ( Restricted for Public World )
- Create a public-facing internet gateway to connect our VPC network to the internet world and attach this gateway to our VPC.
- Create a routing table for the Internet gateway so that the instance can connect to the outside world, update and associate it with the public subnet.
- Launch an ec2 instance that has WordPress setup already having the security group allowing port 80 so that our client can connect to our WordPress site. Also, attach the key to the instance for further login into it.
- Launch an ec2 instance that has MYSQL setup already with a security group allowing port 3306 in private subnet so that our WordPress VM can connect with the same. Also, attach the key with the same.
Note: WordPress instance has to be part of a public subnet so that our client can connect our site.
MySQL instance has to be part of a private subnet so that the outside world can’t connect to it.
Don’t forget to add auto IP assign and auto DNS name assignment options to be enabled.
Amazon Virtual Private Cloud vpc enables you to launch AWS resources into a virtual network that you’ve defined. It provides the virtual or private space or data center inside the AWS Data Center.
Subnet is part of the network, or part of the entire availability zone. A subnet is a range of IP addresses in your VPC.
Prerequisites Before getting started
- AWS account
- Configure AWS CLI in your System.
Configuration of AWS CLI
- Terraform installed and setup path in the system environment variable.
Let’s Get Started
Add Provider.
In a new workspace create a .tf file and set provider details.
provider "aws" {
  region  = "ap-south-1"
  profile = "shashikant"
}
Create VPC
For creating VPC, we write
resource "aws_vpc" "shashikant_vpc" {
  cidr_block       = "192.168.0.0/16"
  instance_tenancy = "default"
  enable_dns_hostnames  = true

  tags = {
    Name = "shashikant_vpc"
  }
}
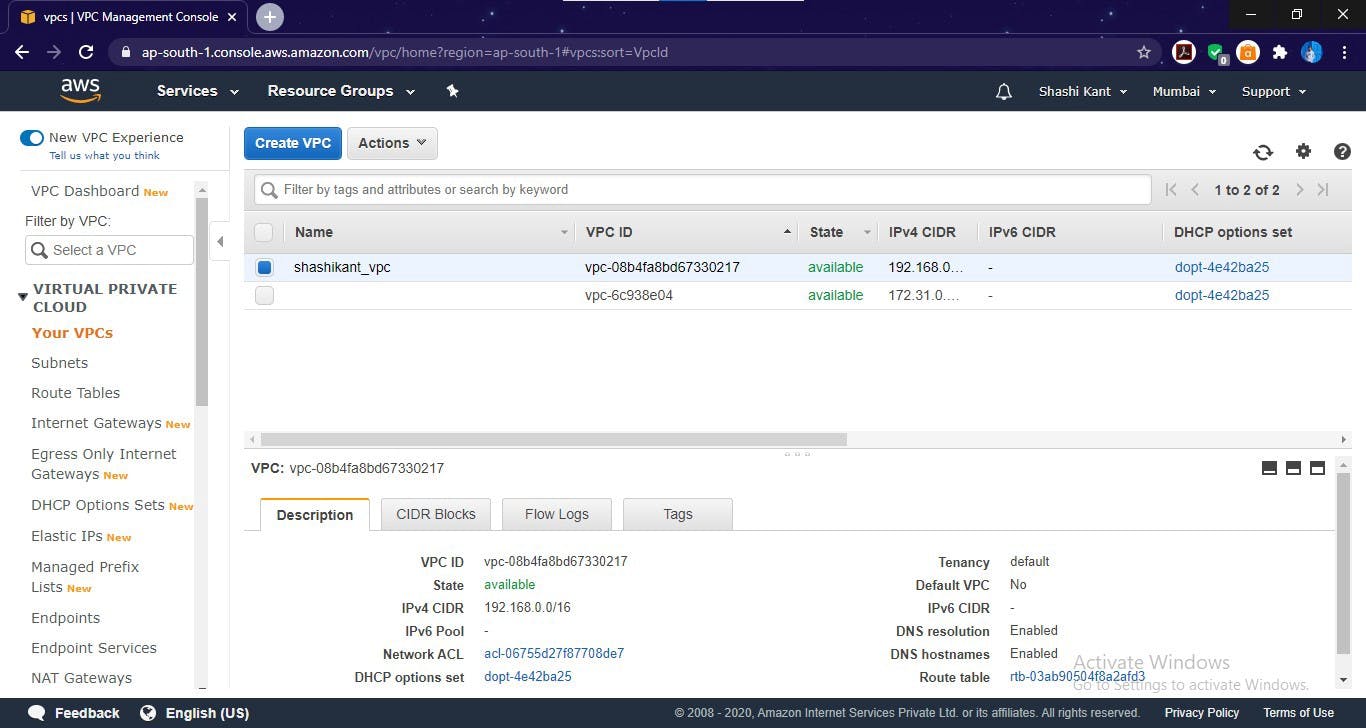 VPC created
Create Public Subnet
Now we create a public subnet on which we launch our web server for the public world.
resource "aws_subnet" "shashikant_public_subnet" {
  vpc_id     = aws_vpc.shashikant_vpc.id
  cidr_block = "192.168.0.0/24"
  availability_zone = "ap-south-1a"

  tags = {
    Name = "shashikant_public_subnet"
  }
}
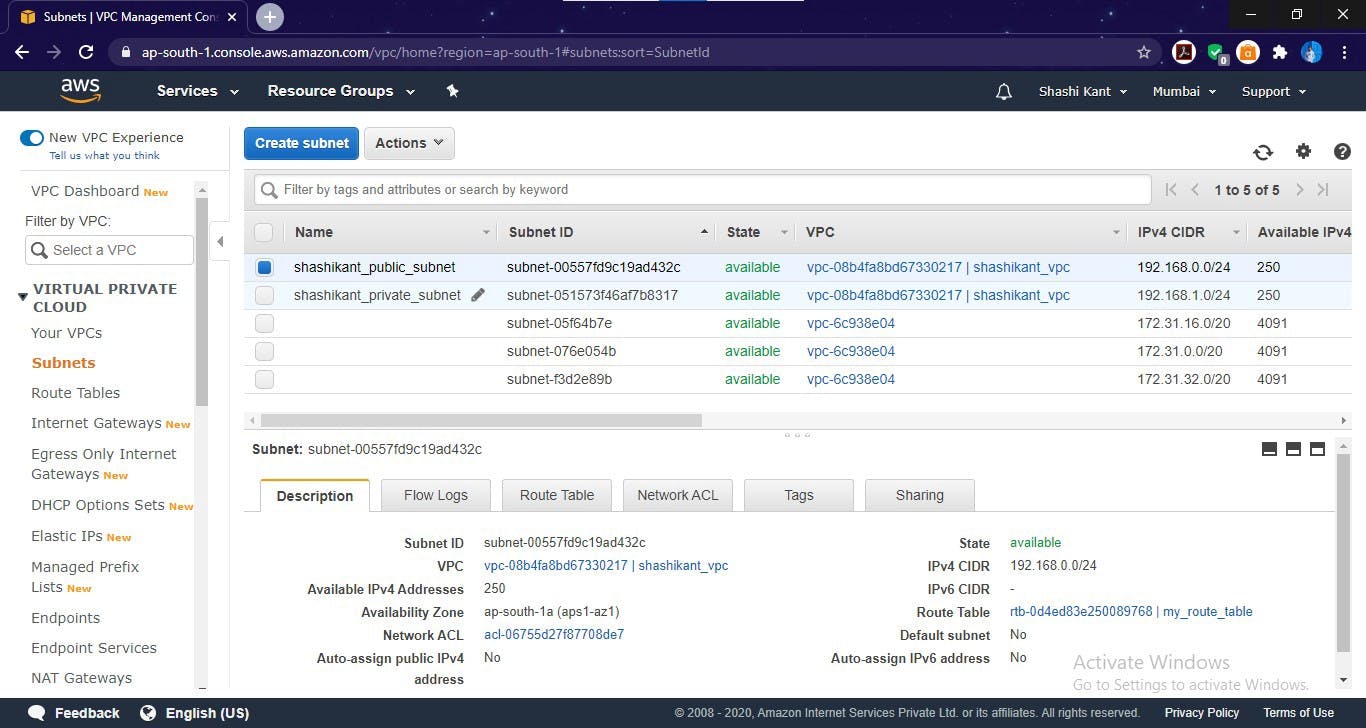
Public Subnet Created in VPC
Here, we want our public subnet to have Internet connectivity, so for that, we create an Internet gateway and attach it to a Route table.
resource "aws_internet_gateway" "my_internet_gateway" {
  vpc_id = aws_vpc.shashikant_vpc.id

  tags = {
    Name = "my_internet_gateway"
  }
}

resource "aws_route_table" "my_route_table" {
  vpc_id = aws_vpc.shashikant_vpc.id

  route {
    cidr_block = "0.0.0.0/0"
    gateway_id = aws_internet_gateway.my_internet_gateway.id
  }

  tags = {
    Name = "my_route_table"
  }
}

resource "aws_route_table_association" "assign_route_table_topublic" {
  subnet_id      = aws_subnet.shashikant_public_subnet.id
  route_table_id = aws_route_table.my_route_table.id
}
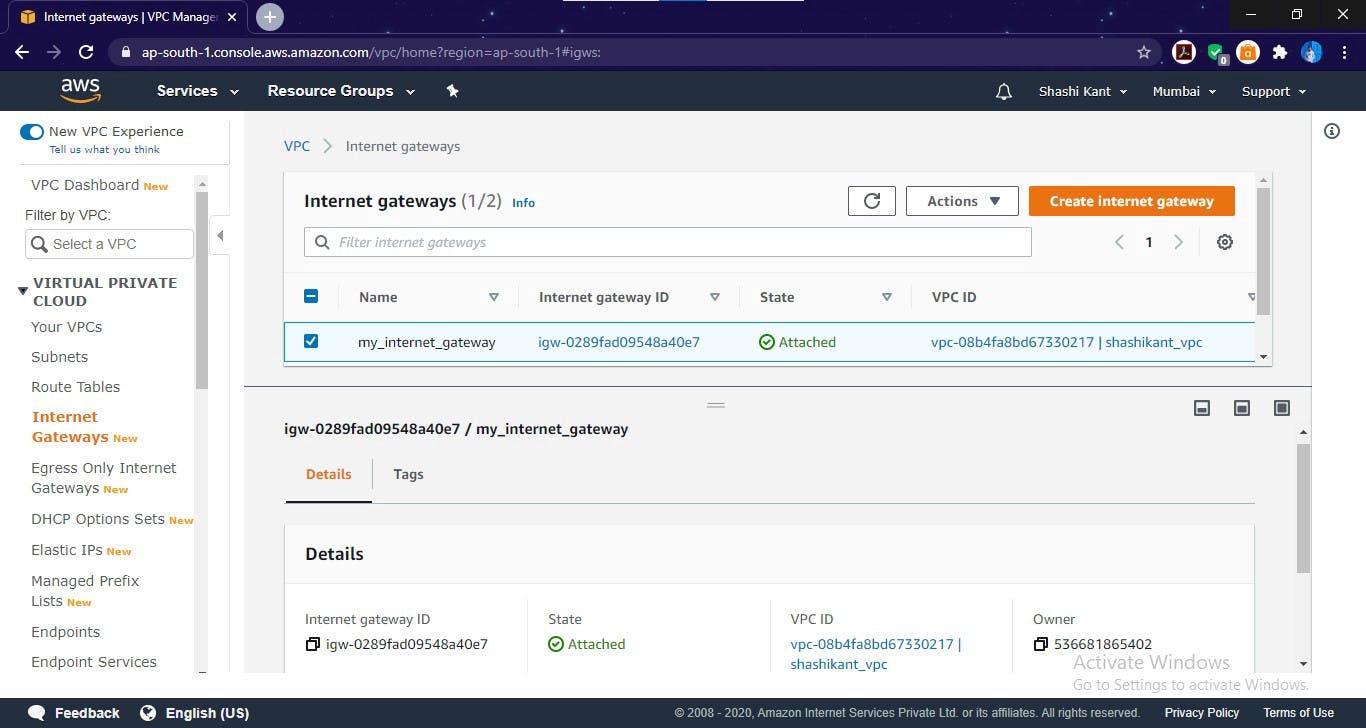
Internet Gateway created
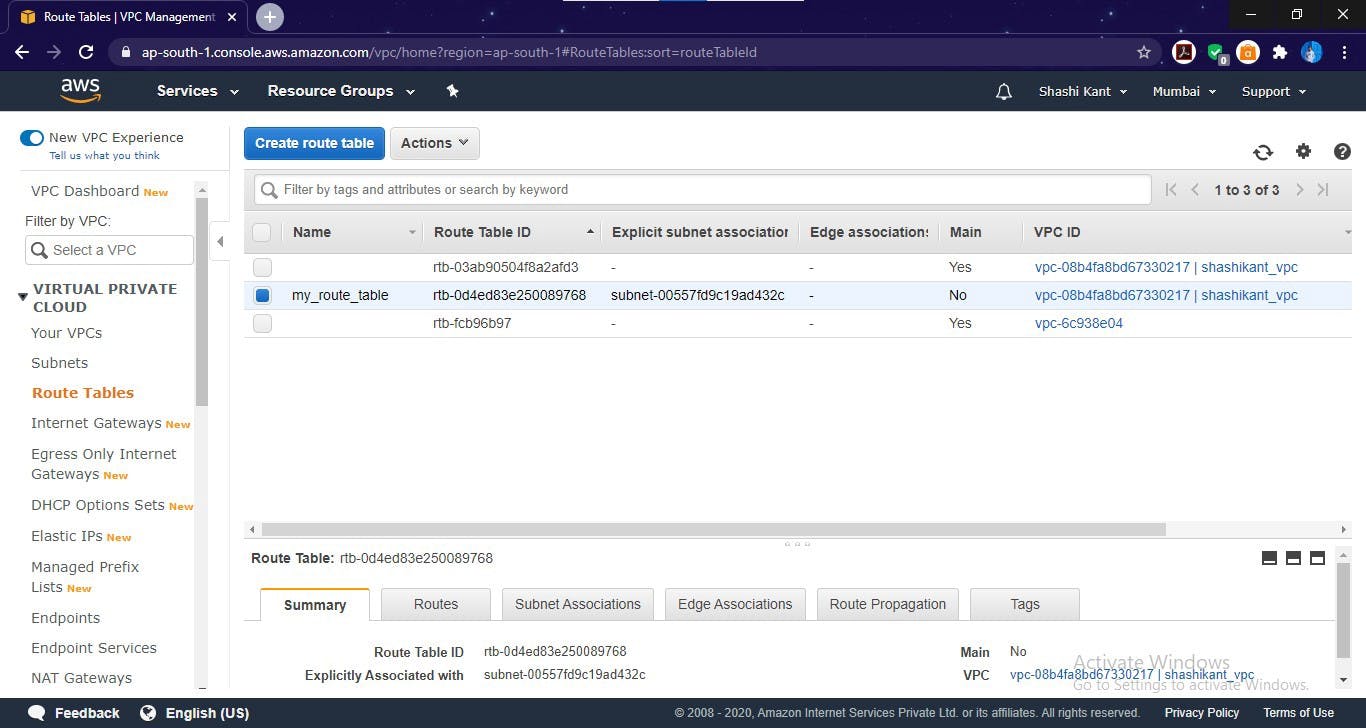
Route table for public subnet
Now our Public Subnet is Ready for connecting with the World.
Create Private Subnet
We create a Private Subnet for launching our Database server.
Here, we don't want to connect with the outside world as we make it private so don’t create an Internet Gateway.
resource "aws_subnet" "shashikant_private_subnet" {
  vpc_id     = aws_vpc.shashikant_vpc.id
  cidr_block = "192.168.1.0/24"
  availability_zone = "ap-south-1b"

  tags = {
    Name = "shashikant_private_subnet"
  }
}
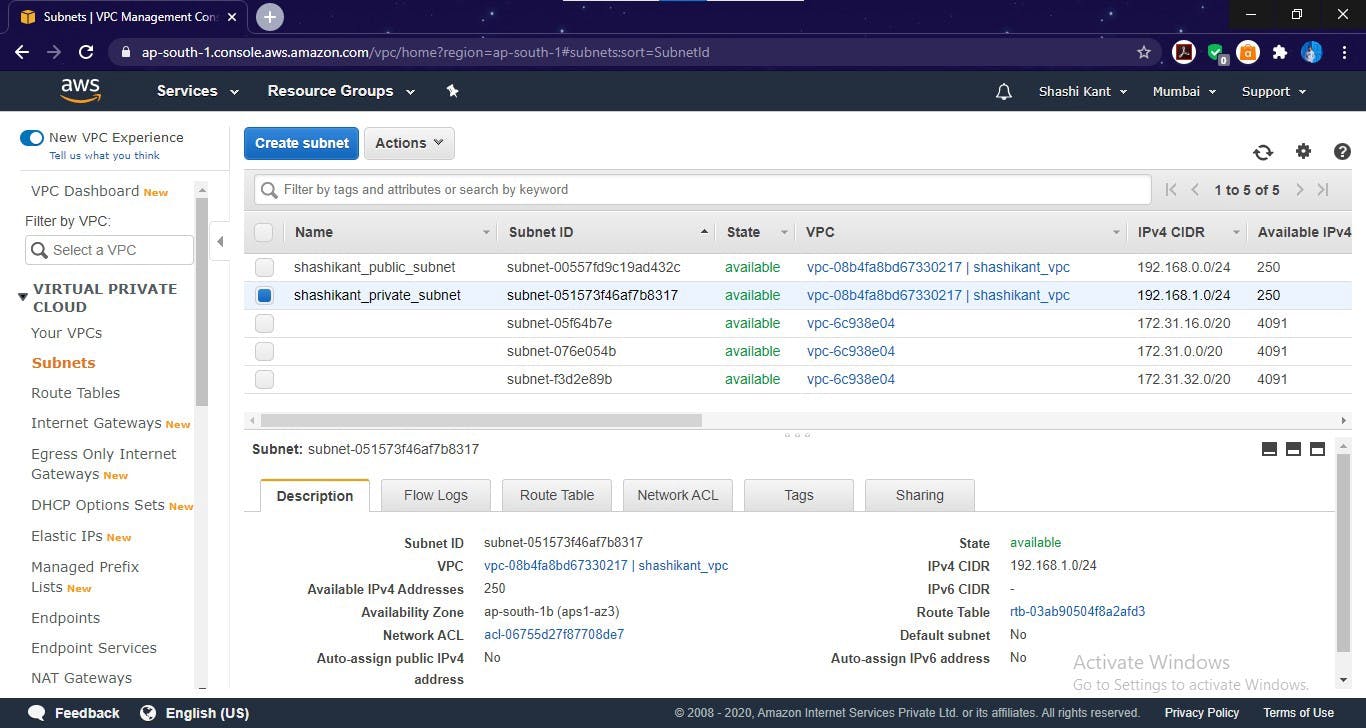
Private subnet created for Database server
Now our Private Subnet is also ready.
Create Security Group
We create two Security groups, one is for Web server and the second is for Database server.
First, we create a Security group for Frontend — webserver.
Here, in the web server security group, I allowed SSH protocol for some testing reasons, but in the real world, we don’t allow SSH protocol.
resource "aws_security_group" "webserver_security_group" {
  name        = "webserver_security_group"
  description = "Allow ssh and http"
  vpc_id      = aws_vpc.shashikant_vpc.id

  ingress {
    description = "HTTP"
    from_port   = 80
    to_port     = 80
    protocol    = "tcp"
    cidr_blocks = ["0.0.0.0/0"]
  }
 ingress {
    description = "SSH"
    from_port   = 22
    to_port     = 22
    protocol    = "tcp"
    cidr_blocks = ["0.0.0.0/0"]
  }

  egress {
    from_port   = 0
    to_port     = 0
    protocol    = "-1"
    cidr_blocks = ["0.0.0.0/0"]
  }

  tags = {
    Name = "webserver_security_group"
  }
}
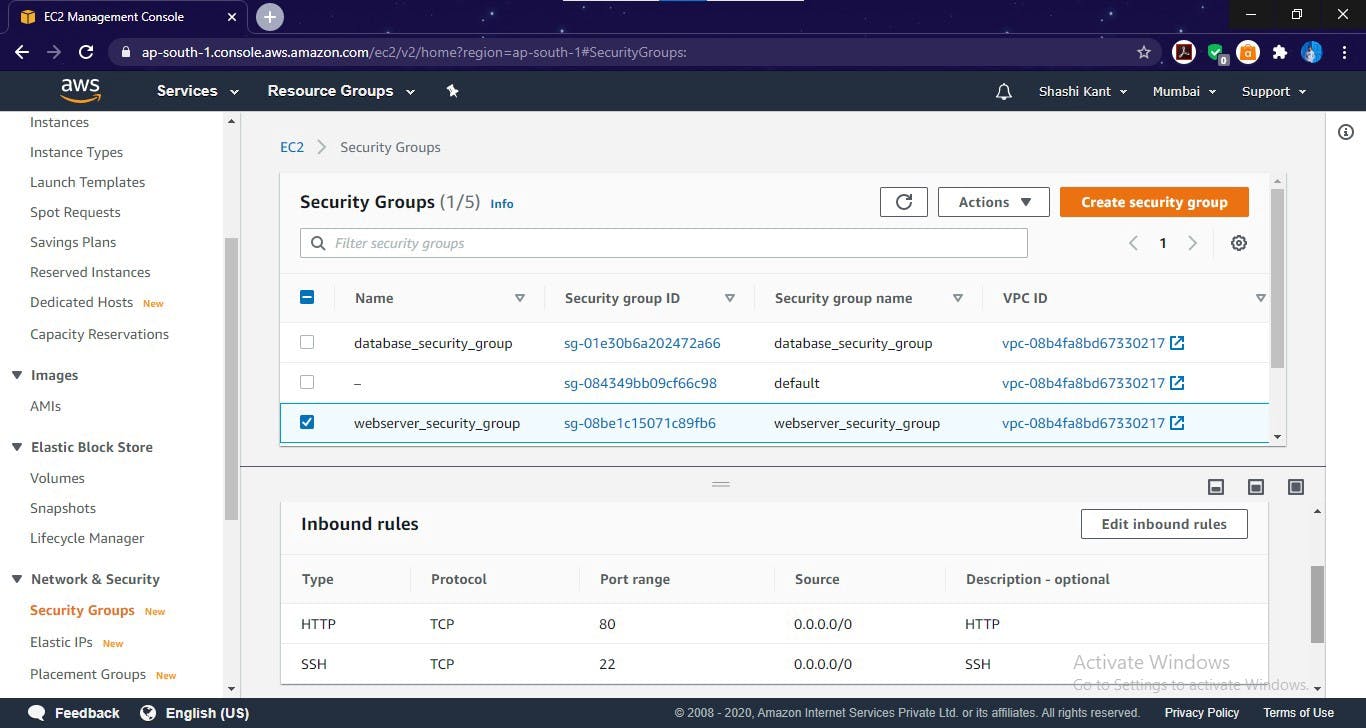
Security Group created for web server
Now we create a Security group for Backend — Database server
Here, In the Database security group, we only allow the 3306 Port number as MySQL Database works on this port number.
resource "aws_security_group" "database_security_group" {
  name        = "database_security_group"
  description = "Allow MYSQL"
  vpc_id      = aws_vpc.shashikant_vpc.id

  ingress {
    description = "MYSQL"
    security_groups = [aws_security_group.webserver_security_group.id]
    from_port   = 3306
    to_port     = 3306
    protocol    = "tcp"

  }
  egress {
    from_port   = 0
    to_port     = 0
    protocol    = "-1"
    cidr_blocks = ["0.0.0.0/0"]
  }

  tags = {
    Name = "database_security_group"
  }
}
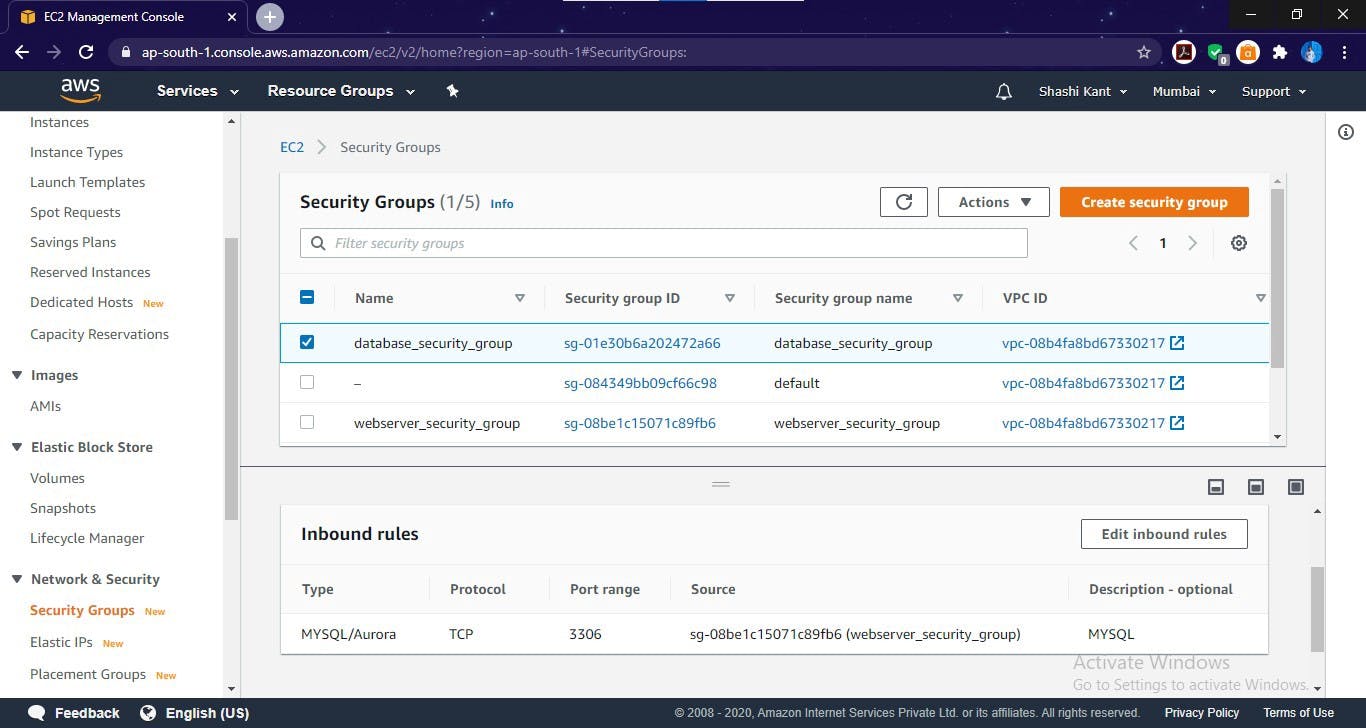
Security Group created for Database server
Launch Web Server
Now we launch web server. Here, I'm using the WordPress site for Frontend Web Server
.
resource "aws_instance" "wordpress" {
  ami = "ami-000cbce3e1b899ebd"
  instance_type = "t2.micro"
  associate_public_ip_address = true
  subnet_id = aws_subnet.shashikant_public_subnet.id
  vpc_security_group_ids = [aws_security_group.webserver_security_group.id]
  key_name = "mykey"

  tags = {
        Name = "wordpress"
  }
}
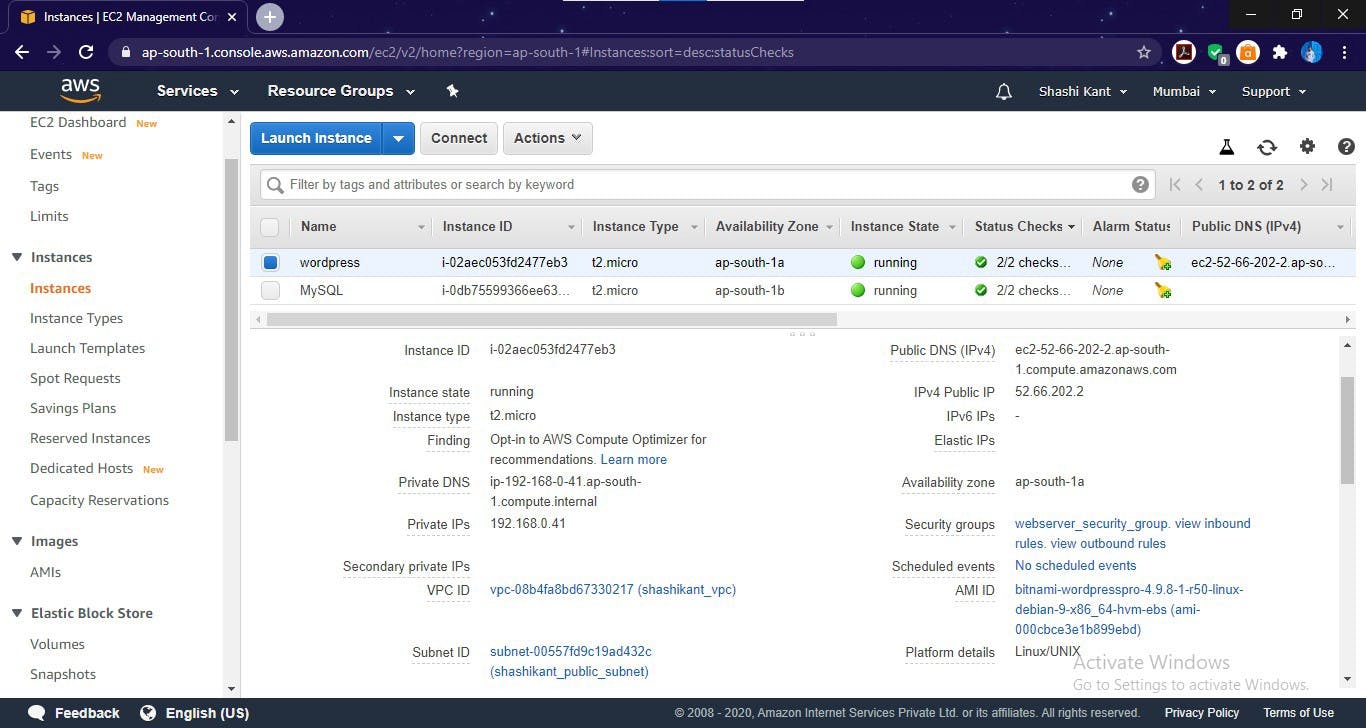
web server instance launched (WordPress)
Launch Database Server
resource "aws_instance" "MySQL" {
  ami           = "ami-0019ac6129392a0f2"
  instance_type = "t2.micro"
  subnet_id = aws_subnet.shashikant_private_subnet.id
  vpc_security_group_ids = [aws_security_group.database_security_group.id]

  tags = {
    Name = "MySQL"
  }
}
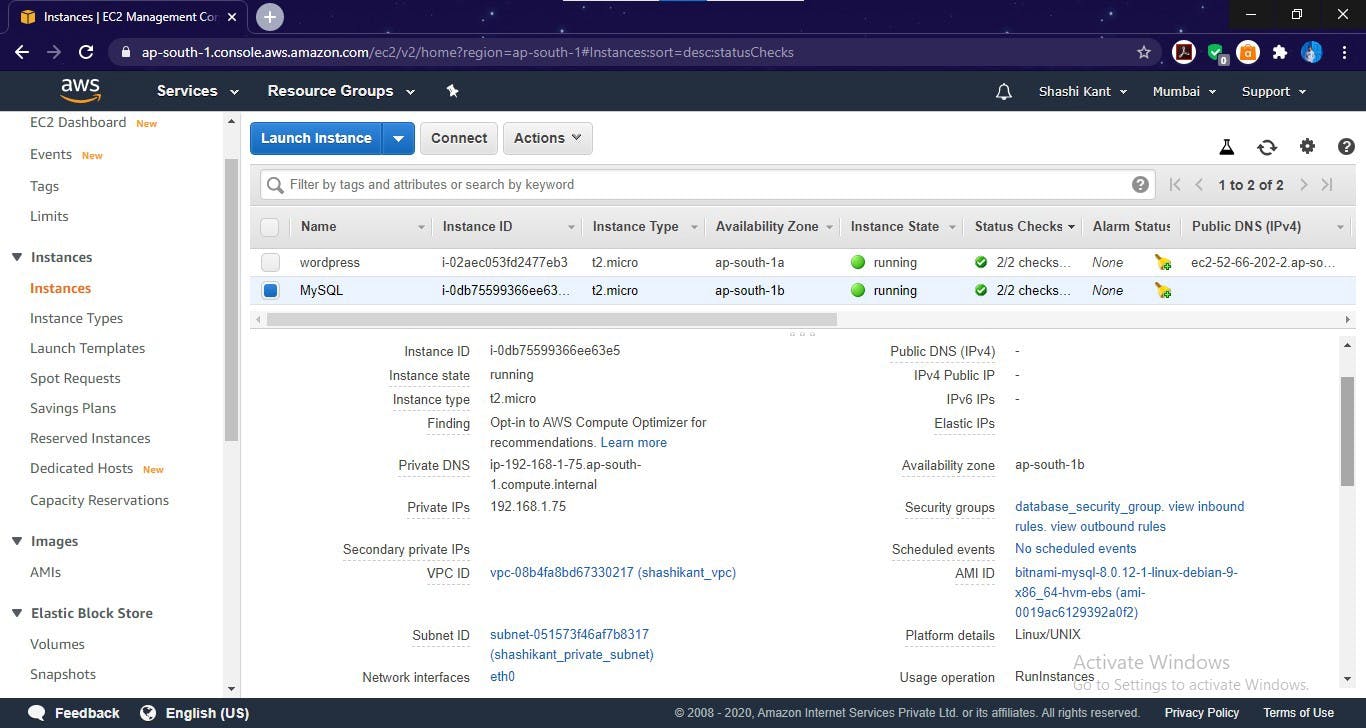
Database server Launched (MySQL)
So, here our Secured Infrastructure is Created with a VPC having two subnets, a private subnet having a Database server, and a public subnet having a web server.
Very Important Instructions
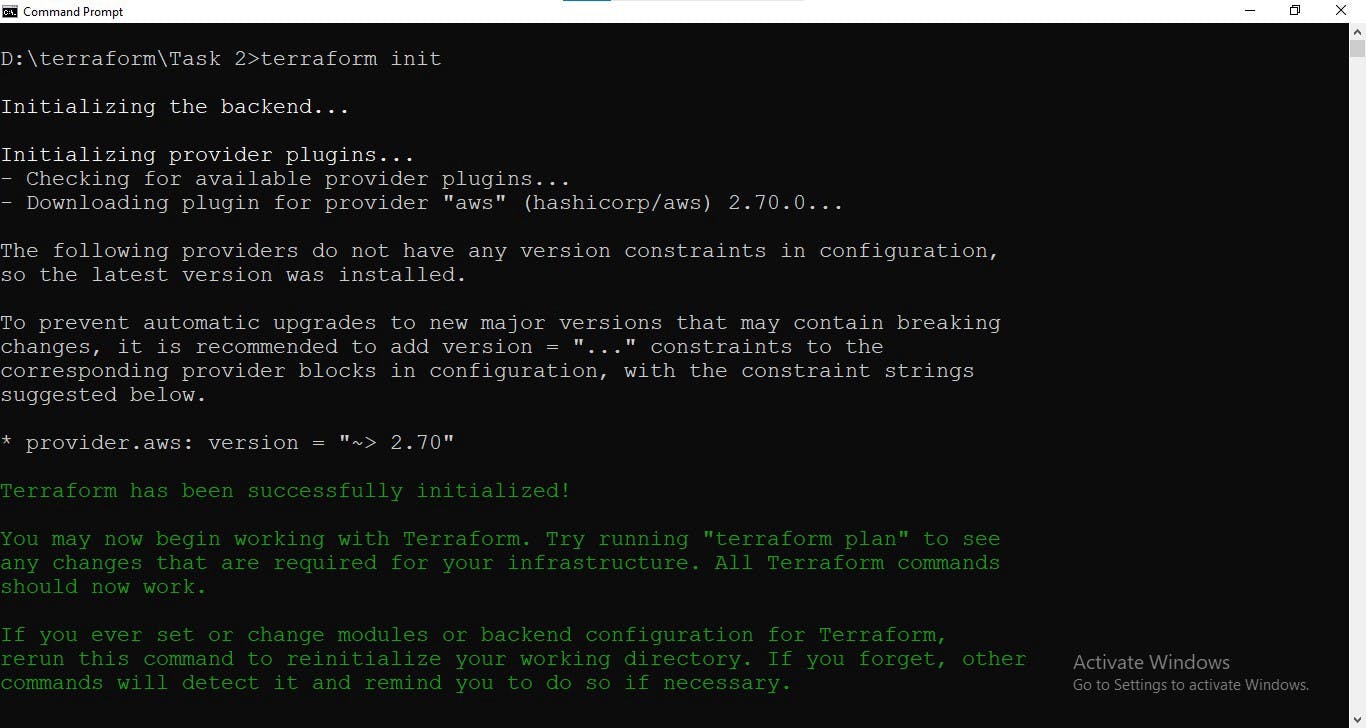
For the first time running Terraform code on AWS CLI, use terraform init to install the plugins.
Do this process only once.
terraform init
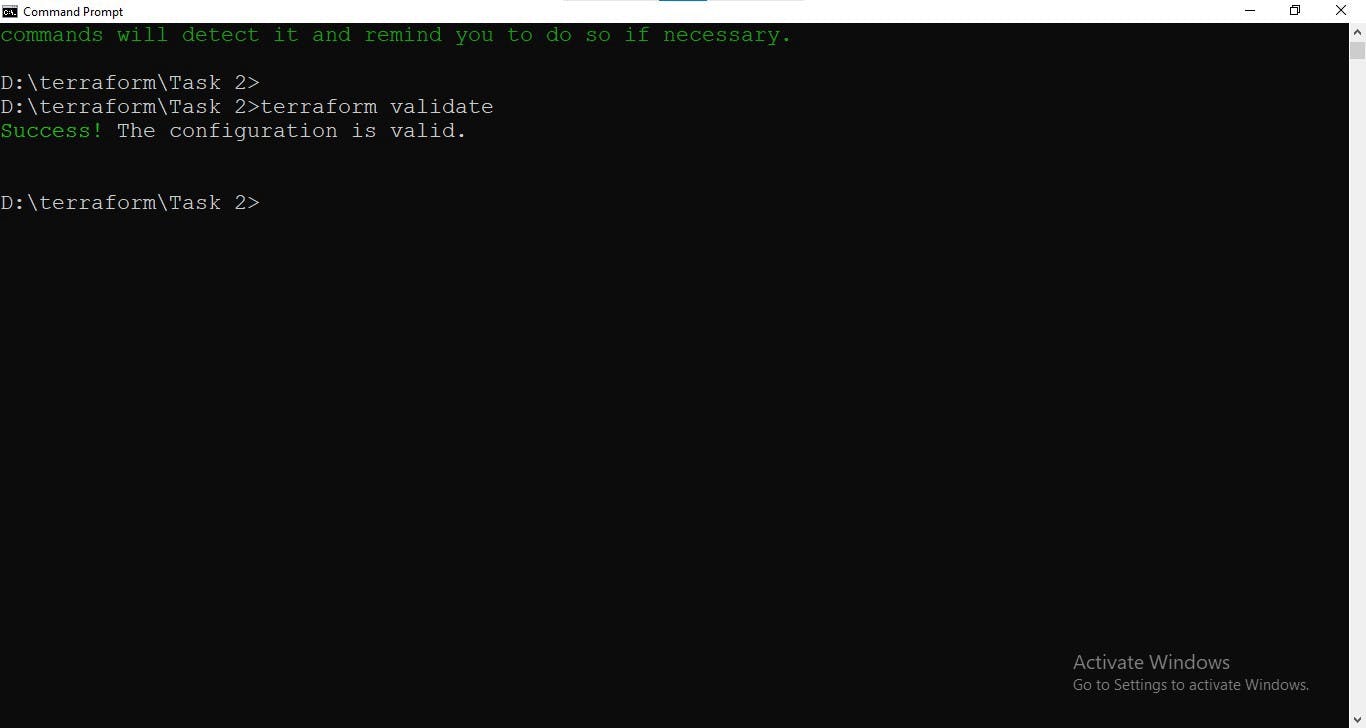
To check the syntax of code run terraform validate. If got some error, then check the syntax of the code, and try again until success comes.
terraform validate
To apply Terraform code to create infrastructure, use
terraform apply
To destroy all the infrastructure created by your Terraform code, use
terraform destroy
Repository Link for Terraform code - GitHub Repo
That’s All, Keep Learning.
! THANK YOU For Reading !